Secure your files in a password protected folder
Secure your files on a password protected folder by using a simple batch file.
It doesn’t take to be a computer hacker or something to do this.
It’s easy as ABC!
Let’s start by opening Notepad.
And paste this code:
After pasting it, find the code “(YOURPASSWORDHERE)” and replace it with your preferred password (w/o quotes).
And save it in your desktop as “config.bat”. Don’t forget to save as “All files” instead of “.txt”.
Then execute the batch file (config.bat) and this prompt will show up.
And then it will create a folder entitled “Locker”.
This is were you will put your private files.
And after putting your files in the Locker, execute “config.bat” again. A prompt will show up asking if you want to lock the folder. Type “y” for yes and “n” for no, hit Enter.
And the folder will be hidden.
To unhide this, execute “config.bat” and a prompt will ask for password.
As you can see, the folder is now entitled “LOCK” rename it as “Locker” every time you will lock it, otherwise it will create another Locker folder.
So there you have it! Your files are safe.
Improve PC performance by using Flash drives (ReadyBoost)
Note: This feature is only available on Vista and 7.
ReadyBoost works by using storage devices such as USB Flash drives, SD cards or any kind of portable flash mass storage system as a cache. File readings, transfers and requests are cached on flash drives before putting it on the hard disk, it will improve speed because flash drives has a much faster seek time than a typical magnetic hard disk (less than 1 ms), allowing it to satisfy requests faster than reading files from the hard disk, thus making your PC fast.
Here are the steps on dedicating a storage device on ReadyBoost
Step 1 : Plug in your USB flash drive or your memory card (Note: The memory capacity must be above 256MB).
Step 2 : Click on Computer, right click your memory card or flash drive, and click Properties.
Step 3 : On the ReadyBoost tab, tick Dedicate this device to ReadyBoost or Use this device and click Apply.
Warning: Do not pull your drive out while it is dedicated to ReadyBoost it might cause your system to crash.
5 Must Have PC Programs
Today I’m going to show you the “10 Must Have PC Programs” that will optimize and maintain your PC clean and fast.
The first one is the CCleaner, short for the “Crap Cleaner”.
It is a freeware system optimization, privacy and cleaning tool developed by Piriform. It removes unused files from your system allowing Windows to run faster and freeing up valuable hard disk space. It also cleans traces of your online activities such as your Internet history. Additionally it contains a fully featured registry cleaner. Download
The second one is the Defraggler
Also developed by Piriform, Defraggler is a fast and powerful disk defragmenting software. It also optimizes your hard drive and checks for errors. Download
The third one is the AVG Antivirus 2013
It is a fast and light Antivirus software developed by Anti Virus Gold (AVG) technologies.
It is stylish and has a Windows 8-like user interface, and sophisticated security technologies. Download
The fourth one is the Recuva
It is a file recovery tool that was also developed by Piriform, Recuva can recover files that are permanently deleted on the recycle bin, digital camera card or MP3 player. Download
The last one is the Internet Download Manager
Developed by Tonec, It is a tool that accelerates your download speed 5 times faster, resume and schedule downloads. It has a resume capability and will restart broken or interrupted downloads due to lost connections, network problems, computer shutdowns, or unexpected power outages. Download
Improve PC performance by disabling unnecessary Windows services
Disable unnecessary Windows services to free up CPU and RAM usage, speed up boot and start up time.
This procedure is very easy, just follow my steps correctly.
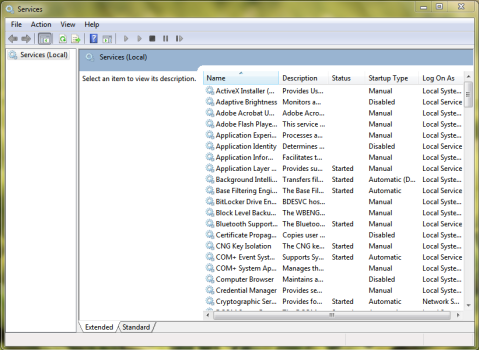
Click start, run, and type “services.msc”. And the services window will show up.
Now you are on services, just double click the service you want to disable and this window will show up.
Now here is the list of Windows services that are safe to disable.
- Application Experience
- Block Level Backup Engine Service
- Certificate Propagation
- IP Helper
- Portable Device Enumerator Service
- Distributed Link Tracking Client
- Protected Storage
- Portable Device Enumerator Service
- Secondary Logon
- Software Protection
- Server
- Tablet PC Input Service
- TCP/IP NetBIOS Helper
- Windows Media Center Service Launcher
- Windows Search
- Remote Registry
- Windows Time
Windows services that are safe to disable if…
- Desktop Windows Manager Session Manager (if you are on a Netbook)
- Diagnostic Policy Service (if you don’t use the troubleshooter)
- Error Reporting Service
- HomeGroup Listener (No Homegroup sharing)
- HomeGroup Provider (No HomeGroup sharing)
- Offline files
- Print Spooler (if you don have a printer)
- SSDP Discovery (No HomeGroup sharing)
- Themes ( if you are on a Netbook)
- Windows Defender (If you have an Antivirus installed)
- Windows Firewall (Firewall installed)
- Windows Image Acquisition (if you don’t have any imaging devices ie., camera, scanners)
- Windows Media Player Network Sharing Services (No Homegroup sharing)
Disabling unwanted Windows services will eventually speed up your PC, prevent application crashes, frees up RAM and lowers CPU congestion.
I hope this article helped and thanks for viewing my blog.
How to speed up your Hard Disk
Speeding up your Hard Disk will improve data transferring, faster shutdown and boot up.
This will take only less than 5 minutes, just follow my steps carefully:
First, we will Enable write caching on the device.
Click Start right click on Computer and click Manage.
Click on Device Manager. And this will show up.
Collapse Disk Drivesand then right click your hard disk device and click Properties and this window will show up.
On the Policies tab, check the “Enable write caching on the device“.
Click OK.
Second, we will Enable the DMA Mode.
On the Device Manger, collapse IDE ATA/ATAPI controllers, Right-click on any label where “Channel” is part of the name (i.e. ATA Channel 0) – Click Properties.
And this will show up.
Go to the Advanced Settings tab, under the Device Properties check Enable DMA.
Restart your Computer.
Improve PC performance by adding Virtual Memory.
Virtual memory or swap memory is used by the computer when it lacks RAM, when your RAM runs low, virtual memory moves data from RAM to the space called “paging file”. As your RAM frees up, your computer will perform tasks better. I’ll show you how to speed up your computer with adding virtual memory.
The first thing to do is to click Start, right click Computer and click Properties.
On the Left panel, click Advanced system settings and this will show up.
Next, click Settings on the Performance option. And this window will show up.
On the Advanced tab, go to Virtual memory option click Change. And this will show up.
Make sure that the “Automatically manage paging file size for all drives” is unchecked.
To set your initial and maximum size, tick Custom size then multiply the amount of your RAM (in GB) to 1024 (1GB = 1024MB and click Set.
For example, I have 2 GB of RAM ( 2 x 1024 = 2048 ). I will put 2048 to my initial and maximum size.
So there you have it. Hope this helped and thanks for viewing my blog.


